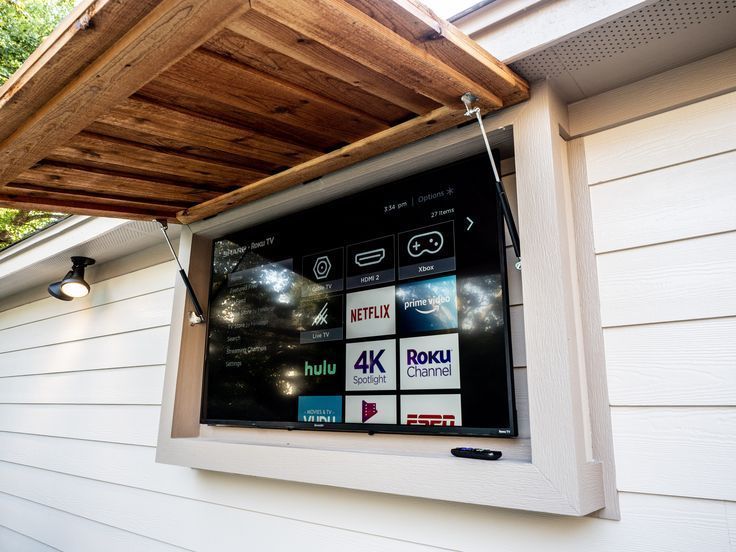
DIY Outdoor TV Enclosure
lianMichael
You want to watch TV outside. But leaving your screen exposed? That’s a fast track to water damage, dust buildup, and a fried circuit board. A weatherproof TV cabinet is your best shot at keeping it safe.
Here’s how to build one that stands up to rain, sun, and everything in between.
Materials You’ll Need
No cheap wood. No weak screws. You need materials built for the outdoors.
-
Pressure-treated lumber (2x4s, 1x6s) – Strong, lasts longer.
-
Exterior-grade plywood – Extra shield against rain.
-
Waterproof wood glue – Keeps it all together.
-
Exterior wood screws – Won’t rust, won’t snap.
-
Hinges & handles – For easy access.
-
Weatherstripping – Seals out moisture.
-
Exterior wood stain/paint – Protects from sun and water.
-
Weatherproof sealant – The final defense.
🔹 Pro Tip: Don’t skimp on quality. Cheap materials = a cabinet that warps, cracks, or leaks.
Need a quicker solution? Check out our guide on Outdoor TV Enclosures for ready-made options.
Tools You’ll Need
The right tools make the job easier. Here’s what you need:
Cutting & Assembly Tools
-
Circular saw or table saw
-
Drill + bits
-
Screwdrivers (manual or electric)
Measurement & Alignment Tools
-
Measuring tape
-
Level
-
Carpenter’s square
Finishing & Safety Gear
-
Sander or sandpaper
-
Safety goggles, gloves, and dust mask
⚠️ Safety First: Power tools can wreck your hands. Wear gloves. Wear goggles. Stay sharp.
Step-by-Step: Build Your Outdoor TV Cabinet
1. Measure & Plan
Measure your TV. Add at least 3 inches on all sides for ventilation. Sketch your design. Make sure it works with your viewing angle and cable setup.
2. Cut the Wood
You need:
Two side panels
One top panel
One bottom panel
One back panel
One or two door panels
Tip: Measure twice, cut once. Wasting wood costs money.
3. Assemble the Frame
-
Build a strong rectangle using 2x4s.
-
Check that all corners are square and level.
-
Secure with wood glue and screws.
4. Attach the Back Panel
-
Screw the plywood back panel onto the frame.
-
Drill small holes for cables & ventilation.
5. Build & Install the Doors
-
Decide: One big door or two smaller ones?
-
Build the door frame with 1x6 boards.
-
Attach plywood or slats to fill it.
-
Leave a small gap around the edges so it opens smoothly.
6. Install Hinges & Weatherproofing
-
Attach weather-resistant hinges.
-
Install handles & latches.
-
Add weatherstripping to seal out moisture.
7. Seal & Protect
-
Apply exterior-grade stain or paint.
-
Let it dry.
-
Seal every edge with weatherproof sealant.
💡 Pro Tip: Don’t rush this step. A bad seal = a ruined TV.
How to Keep Your Cabinet in Top Shape
A well-built cabinet lasts years—if you maintain it.
Check for moisture or pests regularly.
Wipe it down with mild soap + water.
Reapply sealant every year.
Keep leaves, dust, and gunk away from vents.
Looking for more outdoor TV protection? Read our guide on Weatherproofing Your Outdoor TV.
FAQs
Will this work for any TV?
Yes, but outdoor-rated TVs last longer. If using an indoor TV, make sure the cabinet is fully sealed.
What if I live in an extreme climate?
Go heavier on sealant and weatherstripping. Consider adding a small cooling fan for hot regions.
Can I buy one instead of building?
Of course. There are ready-made weatherproof TV enclosures that save you the hassle. Check out Acrtmatic Outdoor TV Covers for an easy solution.
Final Thoughts: Enjoy TV Outside—Worry-Free
Your TV is safe. Your outdoor setup looks pro. And you didn’t spend a fortune on a pre-built enclosure.
Now fire up the grill, call some friends over, and enjoy the game or movie night—rain or shine.
Want an even easier option? Check out Acrtmatic Outdoor TV Covers—built for full weather protection.

🔎 Email- TRANSFER 1,522546 BTC. Receive => https://graph.org/Message--05654-03-25?hs=db9738f0332e57614d8912aa8e6105ad& 🔎
lj4ei2
📍 + 1.776877 BTC.GET - https://graph.org/Message--17856-03-25?hs=db9738f0332e57614d8912aa8e6105ad& 📍
4hok33
📢 Reminder; + 1.154809 bitcoin. Assure >>> https://graph.org/Message--17856-03-25?hs=db9738f0332e57614d8912aa8e6105ad& 📢
tbqr07
🔏 + 1.422188 BTC.NEXT - https://graph.org/Message--120154-03-25?hs=db9738f0332e57614d8912aa8e6105ad& 🔏
ab3yzl
🗓 + 1.143748 BTC.NEXT - https://graph.org/Message--04804-03-25?hs=db9738f0332e57614d8912aa8e6105ad& 🗓
fuszup